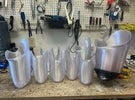
3D Printing Check Sockets: Process, Benefits, and the Best Materials
, by Hugh Sheridan, 6 min reading time

, by Hugh Sheridan, 6 min reading time
In prosthetics, the check socket is one of the most important stages in fitting a patient with a comfortable and functional device. Traditionally, check sockets are vacuum-formed over plaster models, a process that is labor-intensive, messy, and difficult to reproduce. With the rise of 3D printing, many clinics and central fabrication labs are replacing plaster and thermoplastic forming with digital socket manufacturing—delivering faster turnaround, lower waste, and greater design freedom.
Traditional check socket fabrication requires casting, plaster filling, modification, and vacuum forming.
With 3D printing, the workflow is reduced to scanning, digital modification, and printing.
This can cut delivery time from days to hours.
Digital scanning and CAD adjustments allow for highly accurate anatomical reproduction.
Small adjustments can be made in software and reprinted quickly without re-casting the patient.
Digital files can be stored, duplicated, and reprinted at any time.
Enables iterative testing without redoing the entire process from scratch.
Less reliance on plaster, thermoplastic sheets, and manual labor.
Lower material wastage compared to thermoforming.
A good check socket material must balance:
Transparency → allows prosthetists to visualize limb fit and check pressure points.
Flexibility with Strength → stiff enough to hold shape, but not so brittle that it cracks during fitting.
Lightweight → comfortable for the patient during trial fittings.
Safe and Biocompatible → non-toxic and skin-safe.
Ease of Post-Processing → smooth edges, polishable, and easily adjustable if trimming is required.
Why it works: PETG is strong, lightweight, and slightly flexible, reducing the risk of cracking.
Advantages: Good transparency, affordable, and widely available in filament form.
Use case: A common choice for transfemoral and transtibial check sockets where visibility of limb contact is important.
Why it works: PC offers higher strength and impact resistance than PETG.
Advantages: Transparent, durable, and heat-resistant, making it reliable during repeated donning/doffing.
Use case: For larger sockets or when patients place more stress on the structure.
Why it works: Nylon provides excellent toughness and flexibility. CF blends add rigidity.
Advantages: Less transparent than PETG/PC, but very durable and resistant to cracking.
Use case: When strength outweighs the need for transparency, such as heavier patients or high-activity trials.
Why it works: TPU is flexible and resilient, offering comfort during trial fitting.
Advantages: Lightweight and shock-absorbing.
Limitations: Not transparent, and excessive flexibility may make it less suitable for structural evaluation.
Use case: Useful for interface liners or flexible brim areas of sockets.
Why it works: SLA and DLP resins can produce highly transparent check sockets with smooth surface finishes.
Advantages: Excellent detail, great transparency.
Limitations: Expensive, brittle compared to FDM thermoplastics, and require post-curing.
Use case: Best for clinics prioritizing visual assessment of contact points.
For general-purpose check sockets, PETG offers the best balance of transparency, cost, and ease of use.
For patients with higher activity or load demands, polycarbonate or nylon provides extra durability.
For ultimate transparency and surface quality, SLA resins are unmatched—though they come at a higher cost and brittleness trade-off.
Some advanced O&P workflows even combine materials: printing the socket body in PETG or PC, while reinforcing or softening select regions with TPU.
Use large-format printers: Most check sockets require build volumes of at least 400–600 mm in height.
Optimize wall thickness: Typically 3–5 mm walls are sufficient for test fittings without adding unnecessary weight.
Orient the print correctly: Printing vertically reduces support structures and improves clarity.
Post-process for comfort: Smooth and polish edges; flame-polishing or vapor-smoothing can improve transparency in PETG and PC.
Iterate quickly: Use digital archives to reprint modified sockets without re-scanning the patient.
3D printing is transforming the way prosthetists fabricate check sockets—replacing messy plaster and vacuum forming with a fast, clean, digital workflow. The choice of material depends on priorities: PETG for transparency and cost, PC/Nylon for strength, and resins for visual clarity. With the right setup, clinics can reduce turnaround times, improve patient experience, and increase overall efficiency in the fitting process.

For orthotics & prosthetics workshops seeking a future-proof, high-precision continuous belt printer that covers insoles plus orthotic components and supports a broad material palette, the...

When done right, total cost per cosmetic prosthetic cover can fall below $20 USD, with print times under 10 hours — a price point that...

This article unpacks the engineering reasons that can drive weight up, explains selection pitfalls, and clarifies where products from Augo (Invent Medical), Instalimb, and Proteor’s...