Open-Source Software in Orthotics and Prosthetics: A Beginner’s Guide
, by Hugh Sheridan, 5 min reading time
, by Hugh Sheridan, 5 min reading time
Digital technologies have transformed the field of orthotics and prosthetics (O&P). From 3D scanning limbs to 3D printing insoles, braces, and sockets, computer-aided design (CAD) has become central to modern workflows. But one major barrier remains: the high cost of proprietary software. For small clinics, startups, and students, licenses for specialized O&P CAD packages can be prohibitively expensive.
Digital technologies have transformed the field of orthotics and prosthetics (O&P). From 3D scanning limbs to 3D printing insoles, braces, and sockets, computer-aided design (CAD) has become central to modern workflows. But one major barrier remains: the high cost of proprietary software. For small clinics, startups, and students, licenses for specialized O&P CAD packages can be prohibitively expensive.
This is where open-source software comes in. A growing ecosystem of free, community-driven design tools allows practitioners to experiment, learn, and even implement digital O&P workflows without major upfront costs.
Accessibility – Anyone with a basic computer can begin exploring 3D design and modeling.
Cost-Effective – No expensive annual licenses; most open-source tools are free.
Flexibility – Open-source software can be customized and extended to fit unique O&P needs.
Community Support – Forums, tutorials, and shared libraries accelerate learning.
Compatibility with 3D Printing – Most open-source CAD packages export in STL/OBJ formats, ready for additive manufacturing.
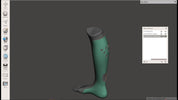
A powerful 3D modeling suite originally built for animation, now widely used in engineering and design.
Why it’s useful: Excellent for sculpting and modifying anatomical scans (e.g., limb shapes, spinal curves).
Getting started: Learn basic mesh editing and sculpting to modify limb scans into orthotic or prosthetic shapes.
Tip: Pair Blender with a 3D scanner or smartphone photogrammetry for patient-specific modeling.
A parametric CAD program, more structured than Blender.
Why it’s useful: Great for designing orthotic shells, mechanical components, or modular prosthetic parts.
Getting started: Use it for dimension-driven design—perfect for joints, connectors, and alignment jigs.
A lightweight mesh editing tool by Autodesk, free to download.
Why it’s useful: Quick socket trimming, smoothing, and preparing STL files for printing.
Getting started: Import a limb scan, hollow it, and export a test check socket file.
A script-based 3D design tool.
Why it’s useful: Ideal for parametric parts like adapters or simple orthotic components where exact measurements matter.
Getting started: Learn simple coding commands to generate customizable brackets or connectors.
Not for design, but critical for preparing prints.
Why it’s useful: Control infill, strength, and print orientation for sockets, insoles, or braces.
Getting started: Import STL files from Blender or FreeCAD and slice for your printer.
Learn the Basics of 3D Design
Start with Meshmixer or Blender for intuitive hands-on sculpting.
Practice with free anatomical models from online repositories (e.g., Thingiverse, NIH 3D Print Exchange).
Experiment with Patient Scans
Many clinics now use low-cost 3D scanners or even smartphone apps (e.g., Polycam, Scandy Pro).
Import these scans into Blender or Meshmixer and learn to modify surface geometry.
Move to Parametric Design
As you grow, explore FreeCAD or OpenSCAD for parts requiring precision and adjustability (joints, pylons, connectors).
Integrate with 3D Printing
Use Cura or PrusaSlicer to understand how wall thickness, infill, and orientation affect strength in orthotic/prosthetic devices.
Start by printing simple insoles, AFO shells, or check sockets to see how design translates to the real world.
Join Communities
Open-source thrives on collaboration.
Explore forums like Blender Artists, FreeCAD Forum, and prosthetics-focused communities on Reddit, Facebook, and LinkedIn.
Learning Curve: Open-source tools often require self-teaching, with fewer O&P-specific tutorials compared to commercial systems.
Validation: Devices made with open-source tools must still undergo proper testing to ensure patient safety.
Integration: Clinics may struggle to integrate open-source workflows with existing proprietary ecosystems.
For novices entering digital orthotics and prosthetics, open-source software offers a low-cost, accessible pathway into CAD and 3D printing. While not as specialized as proprietary O&P platforms, tools like Blender, FreeCAD, and Meshmixer provide everything you need to start designing insoles, braces, and sockets. With patience, practice, and community support, open-source workflows can become a powerful asset in clinical and central fabrication environments.
Greetings! I am interested to learn more about this software. Let us guide us about it and how we can start it. Thanks

Explore the balance between digital innovation and manual skills in prosthetics and orthotics,

As digital workflows become more practical for orthotic, prosthetic, podiatry and rehabilitation services, foot scanning is moving from a specialist technology into everyday clinical use....

OTWorld 2026 opens in Leipzig next week with 570+ exhibitors, start-ups, 3D printing, AI, orthopaedic footwear, prosthetics, neuro-orthotics and rehabilitation technology.